
How to Transcribe in Microsoft Word

How to Transcribe in Microsoft Word
Want to convert your audio or video file into a written Word document? If you have a Microsoft 365 premium subscription, then you can use Word Online's built-in transcription tool to convert live or recorded audio to text.
Bear in mind that the Microsoft Word transcription feature only works with the web version and not the desktop application, so the alternative is to use a third-party tool like Transcribe.
Here's a step-by-step guide on how to use Microsoft Word's transcription feature, plus a look at how it measures up against the competition.
Jump to:
How to transcribe live audio to text in Microsoft Word
Here's how to transcribe live audio using Word for the web.
Step 1: Open Word Online, log in, and open a new document.
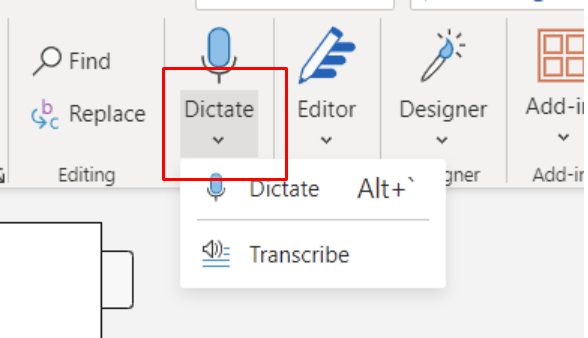
Step 2: Navigate to the 'Home' tab, then click the dropdown arrow next to or below the 'Dictate' tab (with the picture of a blue microphone).
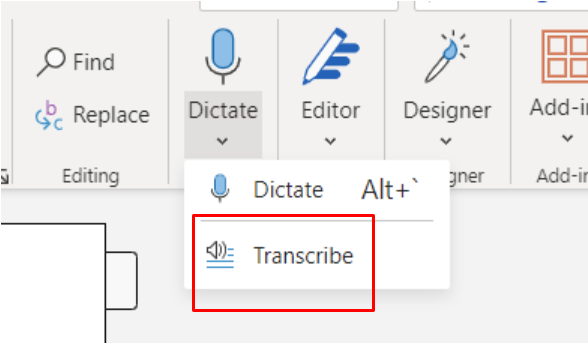
Step 3: Select 'Transcribe' from the dropdown menu.
Step 4: If you haven't transcribed previously, you'll need to grant Microsoft 365 access to your microphone.
Step 5: A message will appear with two options: upload audio or start recording. Select 'Start Recording'.
Step 6: The timer will start, and you can begin speaking. The transcription doesn't take place as you speak - it will be processed once you've finished recording.
Step 7: If you need to take a break but don't want to end the recording, click the pause button. When you're ready to continue recording, click the microphone button.
Step 8: Once you've finished recording, select 'Save and transcribe now'.
Depending on the length of your recording, it could take a few minutes for Word to transcribe the recording and upload it to OneDrive. When it's ready, the transcript will appear in the same pane as the recording.
How to transcribe recorded audio to text in Word
Here's how to transcribe recorded audio (or video) using Word.
Step 1: Open Word Online, log in, and open a new document.
Step 2: Navigate to the 'Home' tab, then click the dropdown arrow next to or below the 'Dictate' tab (with the picture of a blue microphone).

Step 3: Select 'Transcribe' from the dropdown menu.
Step 4: If you haven't transcribed previously, you'll need to grant Microsoft 365 access to your microphone.
Step 5: A message will appear with two options: upload audio or start recording. Select 'Upload Audio'.
Step 6: Select an audio file for your computer. Microsoft Word allows you to upload and transcribe mp3, mp4, m4a, and wav files.
Microsoft will automatically start transcribing the audio file, and how long it takes will depend on the file size. Once it's ready, the transcription will appear in the same pane as the audio file.
Editing your Microsoft Word transcription
The transcription you receive from Microsoft Word won't be perfect, but you can edit any errors as needed. There are two days of doing this: in the transcription pane, or by copying and pasting the transcript into your Word document.
To edit the transcript within the transcription pane, hover over the section you want to edit and click 'Edit transcript section'. You can play, pause, rewind, and adjust the playback speed of the recording using the controls in the transcription pane. Edit the content or change the label, then click 'Confirm' to save your changes.
To edit the transcript as a normal text document, select 'Add all to document'. If you only want to add certain sections, hover over these sections one by one and select 'Add section to document'.
Why can't I transcribe in Word?
If you can't see the Transcribe option in Word, then it's most likely because you're using the Microsoft Word desktop app, rather than Word Online (part of the Microsoft 365 package). The transcription feature is only available with the web version. If you don't have an online subscription (and a premium one at that), then the alternative is to use a third-party tool like Transcribe!
Using Transcribe as an alternative
Don't have a Microsoft 365 premium subscription? No fear! Transcribe is a great alternative for several reasons...
More languages supported: We support more than 120 languages and dialects, whereas Microsoft only supports 80.
More file formats supported: We support a broader range of file formats, including mp3, m4a, wav, m4v, mp4, mov, and avi. If your file is in a format that isn't supported, get in touch and we'll help you to convert your file.
Transcribe on your phone: Our app makes it possible for you to transcribe on your phone, whereas with Word, you have to be logged in on the new Microsoft Edge or Google Chrome.
Once you've got your written transcript, you can save it as a TXT or DOCX file and open it in Microsoft Word to edit it there.
Here's how to get a transcript using Transcribe
1. Download the Transcribe app or launch the online editor
2. Upload your audio file
You can import audio files from any app or cloud storage system, including Google Drive and Dropbox. You can also record and review conversations in real time with our live transcription service.
3. Choose your language
Select the language of your recording from more than 120 languages and dialects.
4. Start the transcription process
Your transcription will be ready in a matter of minutes thanks to our speedy AI software.
5. Your transcription is ready!
Now that the transcription is ready, you can proofread and polish the text in the app, online or in your preferred file format - with or without timestamps. With our standard version you can export your transcribed text to TXT, or upgrade to our PRO service to export to PDF, DOCX, SRT and JPG.
Check out our guides on how to transcribe audio and how to transcribe video for more tips and tricks to help you on your transcription journey!
Written By Katie Garrett