
How to Transcribe a Zoom Meeting

How to Transcribe a Zoom Meeting
Transcribing your Zoom meetings can be useful for a variety of reasons. For starters, it helps [make your Zoom meetings more productive]{.underline}. By making notes retrospectively rather than during the meeting or webinar itself, you (or your meeting attendees) can stay focused and engaged rather than distracted and stressed. Once you've made or received your transcript, you can use it to compile meeting notes to share with colleagues and clients.
But the benefits don't end there. Zoom transcriptions can be repurposed and used for reports and articles to support your marketing activity, and they can also be turned into subtitles to accompany webinar recordings to [make your video content more accessible]{.underline}.
Whatever your business objectives, find out how to transcribe a Zoom meeting with our handy step-by-step guide.
Jump to:
Tools for transcribing a Zoom meeting
- Zoom's transcription offering
Zoom has its own built-in audio transcription software, however many users report that it can take hours or even days for the transcription to complete.
- Human transcription services
Transcription services using real-life humans promise accuracy, but these services are typically slower and more expensive than their automated counterparts. In fact, [an hour of audio takes approximately four hours]{.underline} for a professional to transcribe, and the average price charged is [75 cents to $1.50 per minute]{.underline}. That works out as $45-$90 per hour of audio transcription, and you might have to wait days or even weeks to receive your transcript.
Find out more about [human vs automatic transcription services]{.underline}.
- Transcribe app and online editor
Our AI-powered automatic transcription software, which integrates directly with Zoom, means you get clear, detailed notes within minutes of the Zoom call ending. Since it's automated, we're able to offer our service at the best possible price too.
We support more than 120 languages and dialects, and with our PRO service, you can store up to 500 hours of Zoom recordings in the cloud, plus you have access to professional support when you need it.
Without further ado, here's a step-by-step guide to help you use Transcribe to convert your Zoom meetings to text...
How to transcribe a Zoom meeting using Transcribe
This section is made up of two parts. The first part is setting up [Zoom integration]{.underline}. You only have to do this once, then you can jump ahead to the next section the next time you want to transcribe a Zoom recording!
Integrate Zoom with Transcribe
1. Enable downloading of Zoom meetings
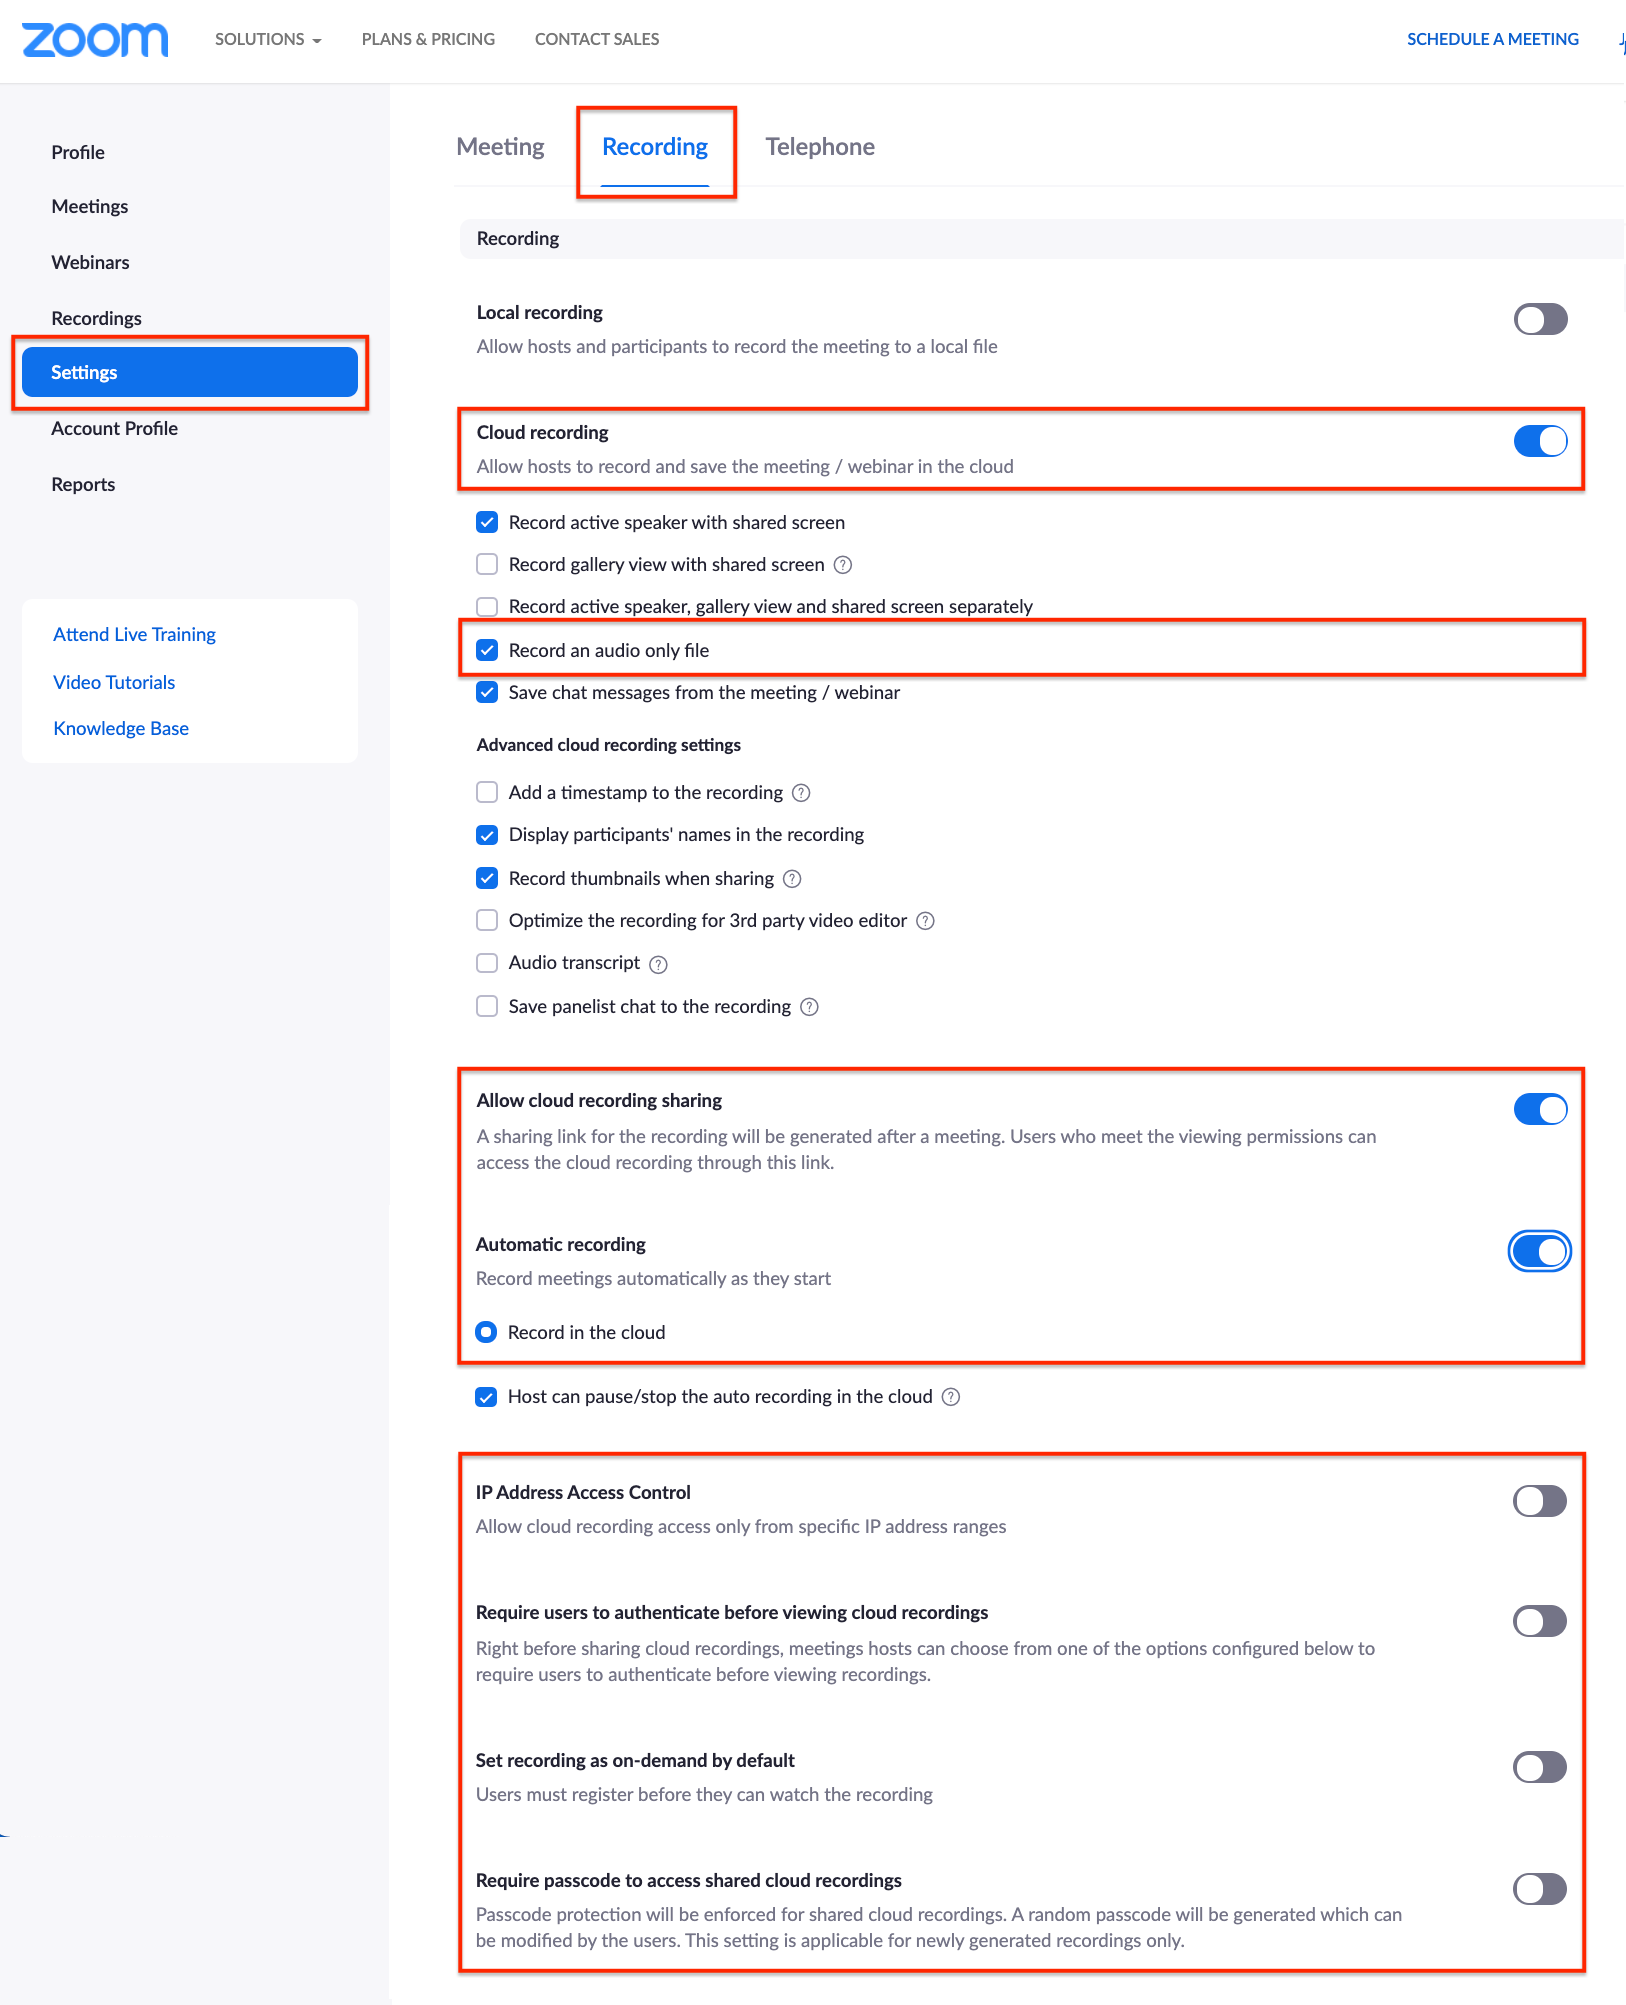
Sign into your Zoom account, go to Settings, then click the Recording tab. Confirm or restore these settings:
-
Cloud recording: Toggled on
-
Record an audio only file: Checked
-
Allow cloud recording sharing: Toggled on
-
(Recommended) Automatic recording: Toggled on
-
(Recommended) Record in the cloud: Selected
-
IP address access control: Toggled off
-
Require users to authenticate before viewing cloud recordings: Toggled off
-
Set recording as on-demand by default: Toggled off
-
Require password to access shared cloud recordings: Toggled off

2. [Download the Transcribe app]{.underline} or launch the [online editor]{.underline}
3. Connect Transcribe to Zoom
Sign into your Transcribe account, go to More-Automation, click the "Connect to Zoom" button, then follow the instructions. If you aren't already signed into Zoom, you'll be prompted to do so, then click "Authorize" to complete the integration.
From this point on, Transcribe will automatically be able to access Zoom recordings via the cloud.
For extra support, check out our guide on [how to set up Zoom integration for Transcribe]{.underline}.
Now you're ready to get your Zoom transcript!
Get your Zoom transcript
1. Import your Zoom recording and choose your language
Import your recording to Transcribe from the cloud and select the language of your Zoom meeting from more than 120 languages and dialects.
2. Start the transcription process
Your Zoom transcript will be ready in minutes! Take a tea break or check your emails, and we'll send you a notification when your transcription is complete.
3. Your transcription is ready!
Now that your Zoom meeting transcription is ready, you can proofread and polish the text in the app, online, or in your preferred file format - with or without timestamps. With our standard version you can export your transcribed text to TXT, or upgrade to our PRO service to export to PDF, DOCX, SRT and JPG.
Use your Zoom transcript to create a meeting summary, subtitles, training material, reports, articles - the sky's the limit!
How to get the most accurate Zoom transcription
If you know you're going to want a transcript of a particular Zoom meeting ahead of it taking place, then there are some steps you can take to ensure your Zoom transcript is as accurate as possible:
- Use a headset or dedicated microphone
Using a headset or a dedicated microphone means the quality of your audio recording will be clearer and louder than if you use the microphone built into your laptop, with less background noise. A higher quality recording will improve the quality of your transcript.
- Speak slowly and clearly
Speaking slowly and clearly can lead to a more accurate transcript.
- Take turns speaking and don't interrupt
Ensure that speakers talk one at a time, as overlapping conversation may result in some confusion in the transcript.
How to transcribe Zoom meetings live
You can use Zoom's automatic transcription software to add real-time captions and/or live transcripts to your Zoom meetings - but only if you're the meeting host. Captions appear on the screen at the bottom of the video, whereas the live transcript option allows a full transcript of the meeting to be viewed in the in-meeting side panel.
To transcribe a Zoom meeting live, open Zoom and go to Settings > Meeting > In Meeting (Advanced). Scroll down and find Automated Captions and Full transcript, and toggle both (or your preferred option) on. Toggle the Save captions button on too if you want to allow participants to save captions and transcripts.
How to record a Zoom meeting
Only the host can start the recording in a Zoom meeting. After starting your meeting, you start recording by pressing Record on the bottom of your Zoom meeting window.
If you have cloud recording enabled, a pop-up will appear asking where you want your recording to be saved: on your computer or to the cloud. You'll know recording has begun because a red light will appear in the upper left corner of your Zoom window with the words "Recording".
If you're not the host, then you'll need to ask for and receive their permission to record the meeting.
How to transcribe a Zoom meeting for free
With Transcribe, you can enjoy the first 15 minutes of transcription time for free, so if your Zoom meeting is on the shorter side then this could work out as an entirely free option. Once you've used up your free credit and seen for yourself whether our service meets your needs, you can buy additional credit for $5 an hour, or get 10 hours for just $35. Upgrade to our PRO service for $10 a month and you'll receive 5 hours of transcription time each month.
Ready to transcribe your Zoom meetings? [Download the Transcribe app]{.underline} or launch the [online editor]{.underline} to get started.
Written By Katie Garrett
How to Setup Zoom For Transcribe
Manage your workflow by transcribing your Zoom meetings with Transcribe. Learn how to setup Zoom with our handy guide.
How to Transcribe a Microsoft Teams Meeting
Stay focused in important meetings, lectures and seminars by transcribing your Teams meetings instead of taking notes. Learn how to transcribe a Teams meeting.

How to Transcribe a Google Meet Recording
Whether you use Google Meet for work or school, say goodbye to note-taking by learning how to transcribe a Google Meet recording automatically with our handy guide.